Saturday, June 29, 2013

Roasted Beets with Kale and Feta

I don't often cook with beets because my wife and I tend to find their earthy taste too strong after a few bites.  The thing is, we really enjoy those first few bites, so my challenge for the beets (which have been sitting patiently for over a week) was to find a way to serve them where we would not be overpowered by their flavor.  I had seen recipes that combined beets with feta, and that seemed like a good start; by using other ingredients with strong flavors, the beets would have more to compete with.  Wanting to use another item from the CSA share, I settled on the kale, thinking that their slightly bitter flavor would stack nicely with the beats (earthy and sweet) and feta (salty). Since kale will lose some of its bitterness when cooked, I used cider vinegar to ensure that it retained a unique flavor that would stand on its own.  I probably would have left the recipe at that, except as I was pulling the feta out of the fridge, my eye landed on a pack of bacon that had used its siren song to lure me into buying it last time I was at the supermarket.  Everything is better with bacon, right?  Darn right it is!  The olive oil can have a rest, for tonight we cook with bacon drippings!


The final dish was a great success. The combination of the beets with the kale, feta and bacon complimented each other wonderfully.  We still could taste that sweet and earthy beet flavor, but it never overpowered the dish.  Needless to say, we cleaned our plates!

One side note that you may want to know (and can probably tell from the picture) is that the beets immediately stained the feta red when I tossed everything together. Certainly didn't effect the flavor, but if you are worried about presentation, I suggest sprinkling the feta on top after tossing the rest together.

Share contents used
Beets (from week 7)
Kale

Ingredients
4 medium sized beets
Salt and pepper
4  thick-cut bacon slices, diced
1/2 lb kale, washed, stemmed and torn into bite sized pieces
3 tbs water
3 tbs apple cider vinegar
1/2 cup crumbled Feta cheese

Preparation
Heat your oven to 425 degrees. Wash and dry the beets then cut them in half and place cut side down on a sheet pan covered with aluminum foil. Place in the oven and roast until the beets can be easily pierced with a fork, about 45 minutes. When done, set aside to cool.

Cook the bacon in a large skillet until crisp, then remove to a bowl and set aside.  Add the kale to the bacon drippings remaining in the pan and stir to coat all the kale with the drippings.  Add the water and vinegar, bring to a simmer and then cover the pan and cook until the kale is wilted, about 5 minutes.  Uncover and continue cooking until the majority of the liquid has evaporated.  Season to taste with salt and pepper.

When the beets have cooled enough to handle, peel them and cut in to half-inch cubes.  Toss the beets, kale and bacon together in a bowl.  Adjust the seasoning to taste and then sprinkle the crumbled feta on top. 

Thursday, June 27, 2013

Fish Tacos with Charred Corn, Radish and Kohlrabi Slaw

If there were a contest to decide the world's most perfect food, I am sure that tacos would be near if not at the top of the list.  They would certainly get my vote.  For me a taco is a blank canvas of corn or flour tortilla that invites creativity and experimentation.  There is a little taco shop near my house that has made its name with interesting fillings like pork with orange peel, chorizo and black bean, and even cactus!  Delicious as they are, they are small, so you need at least 4 for a meal and at $3-$4 each, I'd go broke pretty quick if I didn't make my own.  Tonight my thoughts turned from the local taco shop to the southwest and fish tacos!  The best fish tacos I've had have been on my trips to Southern California, but since six hour plane rides are not a good ingredient in any meal, I've had to make do with cooking them myself. The key to good fish tacos is (big surprise) the fish.  I've played around with this recipe for a couple years, trying different fish and seasonings before settling on what's shown here.  I use tilapia because of its mild flavor and that it stays in one piece and won't flake apart when cooked, cod works as well if you can't get tilapia, but may fall apart easier. For seasoning, I've tried it seems almost every possible spice combination, but ultimately settled on Old Bay seasoning.  Part of me felt a bit lazy doing this ("a real cook makes his own spice rub!") but in the end the folks at Old Bay know what they are doing when it comes to seafood seasoning.


The other toppings for the taco change every time I make it depending on what I have on hand, but there are typically three of them; a cheese, a vegetable and a sauce or salsa.  Tonight I dug in to the remnants of last week's share for the vegetable and pulled out some radishes and the kohlrabi bulb to make a simple light slaw. The two complimented each other nicely to give a cool crunch to the taco.  A charred ear of corn provided a bit of sweetness (and a fun popcorn smell) to balance the peppery radish.

Share contents used:
Radish
Kohlrabi

Charred Corn, Radish and Kohlrabi Slaw
One fresh ear of corn
1 cup julienned radish
1 cup julienned kohlrabi
Lime juice
Salt

I used a mandolin to julienne the radish and kohlrabi, but if you don't have one you can use a knife. Start by peeling the kohlrabi and then cut it in half.  Place the flat side on the cutting board and cut in into thin slices.  stack the slices and then cut again into matchsticks.  Slice the radishes the same way (no need to peel those).


Normally I would use the grill to char the corn, but I didn't feel like getting the grill set up and heated for just one ear (also its 90 degrees and humid out), so I turned to my gas stove.  After removing the corn from the husk, I placed it over the open flame, turning occasionally with tongs until it had nice char marks on all sides.  A word of caution on this technique, some kernels may pop and splatter you with hot corn juice, so an apron and/or potholder may be in order. Immediately after you've completed the char, wrap the corn in foil so the residual heat will cook the kernels all the way through.


When the corn is cool, cut it off the cob.  Toss the kernels together with the radish, kohlrabi and the juice of half a lime.  Season with salt to taste.

Fish Tacos
1 lb tilapia fillets (or other firm white fish)
1/4 cup whole wheat flour
1 tbs Old Bay Seasoning
Salt and pepper
Olive oil

Corn tortillas
Queso Fresco (or any soft, crumbling cheese)
Lime wedges
Mango sauce (see below)

Preparation
About 15 minutes before you will eat, wrap the tortillas in foil and place in a 275 degree oven to warm.

In a medium bowl, mix the flour and Old Bay.  Cut the fish into 1 inch cubes, then season with salt and pepper and toss with the flour mixture until lightly coated.  Heat the oil in a non-stick skillet over medium heat.  Add the coated fish and cook until the fish is cooked through and starting to brown, about 5-7 minutes.  

Assemble the tacos by spooning a few pieces of fish into a warm tortilla.  Top with some of the crumbled cheese, mango sauce and the corn, radish, kohlrabi slaw.  Serve with lime wedges and any other toppings that you enjoy (sour cream, tomato, etc.)


Mango Sauce
3/4 cup ripe mango, fine dice
1/4 cup cider vinegar
Juice of one lime
1 small clove of garlic, crushed
1 tsp Serrano chili pepper, minced
1 tsp Thai hot chili paste
1 tbs chopped fresh parsley

Preparation
Combine all ingredients in a bowl and mix well.  Let stand at least 30 minutes before serving for the flavors to meld.

Week 8 Share


Strawberries, 21 oz ($2.50)
Snow Peas, 8 oz ($4.00)
Cauliflower, 2.5 lbs ($7.47)
Collards, 0.5 lb ($0.65)
Chives, 1 bunch ($2.49)
Fresh Thyme Plant ($2.89)
Chicory, 4 oz ($0.60)
Red Leaf Lettuce, 4 oz ($0.50)
Kale, 0.5 lb ($0.85)
Broccoli, 2 lb ($1.98)
Green Cabbage, 2.75 lbs ($1.50)

Total share value = $25.45

Great to see the variety continuing to grow as the season goes on.  Snow peas, collards, endive and cabbage  all making their first appearance.  The snow peas are so fresh and sweet, already my daughter has put a dent in those!  Chicory is a new vegetable for me, a somewhat bitter tasting leafy green that should be good raw or cooked.  Lots to work with this week, and I'm behind on the week 7 share as well. I think I'll have to focus on finding recipes that use more than just one item to make sure nothing goes bad.

Wednesday, June 26, 2013

Japanese Beef Bowl with Broccoli

I was thinking about describing this meal simply as a Japanese version of beef and broccoli, but connecting it in any way to the common Chinese takeout dish of soggy, over-sauced broccoli and greasy beef does it a great disservice. Very little oil is used in cooking the beef, which is simmered with the onions in its sauce until tender.  The broccoli is cooked separately so you don't end up with beef flavored broccoli.  The end result is a hearty, but light meal that is packed with flavor.  The takeout menu will have to wait for another night!


This meal also gave me the opportunity to try out the Rakkyo that I made a few weeks ago.  Pickles are a important part of Japanese cuisine, and in addition to these we also had some Takuan (pickles daikon) and Shoga (pickled ginger).  The Rakkyo turned out quite good.  The scallions had softened some, but retained a nice crunch with a slightly sweet vinegar flavor.  I'm sure they'll continue to improve as they age longer.


The broccoli we cooked very simply.  A quick dip in boiling water until crisp tender then drained and dressed with ponzu and sesame seeds.  Ponzu is a slightly lemony tasting sauce made from mirin, rice vinegar, fish flakes, seaweed and the juice of a lemon (or other similar citrus juice).  Often used as a dip for meat or sushi, it adds a nice bit of flavor that complimented the fresh broccoli without covering up the taste.


Share contents used:
Broccoli

Ingredients (for the beef dish)
1/3 lb of beef round, thinly sliced
½ of a small yellow onion, thinly sliced
1 tsp vegetable or canola oil
2 tbs soy sauce
1 tbs mirin
½ tbs sugar
1 tbs cooking sake
½ tsp dashi
5 tbs water

Preparation
Heat the oil in a medium saucepan until hot, then add the beef and saute until browned. Add the onion and add all the other ingredients.  Stir to combine then cover and cook until onion is tender, 10-15 minutes.  Serve hot over white rice.  Garnish with chipped scallion and pickled ginger.

Sunday, June 23, 2013

Sicilian Pasta With Cauliflower

Pasta is a staple in our house, showing up on our table at least twice a week in some form.  For that reason, I am always on the lookout for new sauces or methods of preparation to keep things interesting.  As good as bowl of spaghetti marinara is, even that gets tiresome if eaten too often.  Cauliflower is a great accompaniment to pasta, and I often use it with cheese based sauces, but with the weather getting warmer my appetite craves something lighter.  The recipe below got my attention because in addition to the cauliflower, it made use of a couple other items I needed to use; the anchovies (left from last week's Cesar salad) and the fresh tomato from this week's share.  Best of all, the other flavors in this dish come from sources not based in dairy or oil.  Saffron, garlic, pine nuts, basil and raisins make for an amazing result.


I found the recipe for this dish in the New York Times dining section.  It has been tweaked a bit below to utilize ingredients I had on hand.

Share contents used:
Cauliflower
Tomato

Ingredients:
1/4 cup golden raisins
Pinch of saffron threads
1 medium cauliflower, about 2 pounds, cut in to small florets
2 tablespoons extra virgin olive oil
2 garlic cloves, minced
3 anchovy fillets, rinsed and chopped
1 lb fresh tomato, chopped
3 tablespoons pine nuts, toasted
Salt and pepper to taste
3/4 pound spaghetti
2 tablespoons grated Parmesan
2 tablespoons slivered basil

Preparation:
Place the raisins in a small bowl and cover with warm water. In another bowl combine the saffron with 3 tablespoons warm water. Let both sit for 20 minutes while you prepare the other ingredients.

Bring a large pot of water to a boil and salt generously. Add the cauliflower and boil gently until the florets are tender, about 7 minutes. Remove the cauliflower from the water (leaving the hot water in the pot), transfer to a bowl of cold water until cool and then drain. Cover the pot and turn off the heat. You will cook the pasta in the cauliflower water. Take any large florets and cut them into small florets or crumble coarsely using your hands.

Heat the olive oil over medium heat in a large, heavy skillet and add the garlic. Cook, stirring, until it smells fragrant, about 30 seconds to a minute, then add the anchovies and tomatoes. Turn the heat down to medium-low and cook, stirring often, until the tomatoes have cooked down and smell fragrant, about 10 minutes. Drain the raisins and add, along with the saffron and its soaking liquid, cauliflower, pine nuts, and about 1/4 cup of the cooking water from the cauliflower. Season to taste with salt and pepper. Cover, turn the heat to low and simmer 10 minutes, stirring occasionally. Keep warm while you cook the pasta.

Bring the cauliflower water back to a boil and cook the pasta. Transfer the cooked pasta to the pan with the sauce along with 1/4 cup of the pasta water (or more if the sauce seems too dry). Toss together with the Parmesan and basil leaves and serve.

Saturday, June 22, 2013

Strawberry Ice Cream

This season has been a great one for Strawberries.  Our CSA farm is reporting record crops, so the berries keep on coming.  Having an abundance of fresh strawberries is by no means a problem, but at the same time, they don't stay fresh that long and we have to find ways to use larger quantities at once to make sure none are wasted.


Buried in storage among the other kitchen gadgets that we never use is our ice cream machine.  It's really a shame that we don't use this more, but with so many good choices in ice cream at the grocery store, the effort to make our own hasn't really been worth it in the past.  Nevertheless, ice cream is a good way to use up a bunch of the berries at once, and also is great for when some of the fruits are a bit passed their prime. In fact, the riper the better!

One of the main challenges we've had in the past when making ice cream is that the result ends up very hard to scoop and tastes icy.  Basically more of a milk popsicle than a ice cream.  Many popular brands use (in addition to the basic milk, cream, sugar, and flavoring) other ingredients to keep the ice cream soft, but these are usually not easily available to the home cook and most of them are chemicals that you would not want to eat anyway.


One of the easiest ways to get a softer result is to not skimp on the sugar.  The higher the sugar concentration, the lower the freezing point, so if a recipe of yours is coming out too hard, try adding a bit more sugar next time.  Every batch is different, especially with added fruit, so its going to be a bit of a guessing game.  Another way to lower the freezing point is to add a little alcohol to the mix.  A high proof liquor like vodka is a good choice because it will not add any unwanted flavor, though you can certainly experiment with flavored liquors that compliment the ice cream's flavor as well.  Don't worry about this technique turning desert into an adults only experience.  You only need a tablespoon or two per quart of ice cream, and you will not taste the alcohol at all.  If all else fails, just let the ice cream soften a bit on the counter before scooping.


Here's the recipe for our homemade strawberry ice cream.  It makes 1 quart. The result was very good, though just a bit harder than I would have liked, probably due to not quite enough sugar, but 10 minutes on the counter softened it enough to make scooping easier.  The flavor was spot on with lots of fresh strawberry and not too sweet.  A prefect treat for the season!

Share contents used:
Strawberries

Ingredients:
4 egg yolks
150 grams sugar (split 50g/50g/50g)
250 ml whole milk
250 ml heavy cream
1 1/2 cup fresh strawberries, chopped

Preparation:
In a bowl, whisk together the egg yolks and 50 grams sugar until the mix thickens slightly and turns pale yellow in color.  Set aside.  In a second bowl, mix the strawberries and 50 grams of sugar. Set aside. In a medium pot, bring the milk and 50 grams sugar to a boil.  Turn off the heat and then gradually pour the egg mixture into the hot milk, whisking constantly.  Return the pot to the heat and continue stirring until the custard has thickened enough so when you coat the back a spoon with it and draw your finger across, a clear line is formed and holds (do not let it boil).  Remove from the heat and pour the custard through a fine strainer into a clean bowl.  Place the bowl in a ice bath to cool the custard.  When cool, mix in the heavy cream. Place the completed mixture in the refrigerator and chill for at least an hour until cold.  Pour the cold custard into your ice cream machine.  Add the strawberries and any accumulated juice.  Process per the machine's directions, then transfer the ice cream to a container and freeze for at least 3 hours before serving.

Thursday, June 20, 2013

Braised Kohlrabi Greens with Garlic and Chives

Tonight was pork chop night, and to accompany the chops I turned to the kohlrabi greens. The greens are rather tough and bitter in raw form, similar to collards, so it seemed best to treat them the way I would collards and go for a slow braise.  For flavoring, I cooked them with garlic and then used the entire bunch of chives from this week's share to add a mild onion flavor at the end .  The result was quite nice, the bitterness of the raw greens mellowed down to just a hint and allowed the more pleasant flavors of the dish to be heard.  This was also a great way to use up all the chives, which would otherwise have languished in the fridge, being slowly picked apart for garnish and other small uses.


Share contents used:
Kohlrabi greens
Chives

Ingredients:
1 tbs olive oil
3 cloves garlic, minced
1 bunch kohlrabi greens, stems removed, chopped. (about 6 cups)
1 1/2 cups chopped fresh chives
Salt and pepper

Preparation:
Heat the olive oil in a large pot over medium heat.  Add the garlic and cook for 1 minute, being careful not to burn.  Stir in the kohlrabi greens plus a quarter cup of water, cover and simmer over low heat until the greens are soft, about 10 minutes. Taste to ensure the greens are softened to your liking and then remove from the heat and stir in the chives.  Season to taste with salt an pepper.

Tuesday, June 18, 2013

Week 7 Share


Strawberries, 1.5 lbs ($4.99)
Tomato, 12 oz ($2.24)
Broccoli, 10 oz ($1.37)
Cauliflower, 1 lb 13 oz ($5.41)
Red Beets, 1 bunch ($2.50)
Cilantro, 1 bunch ($0.99)
Dill, 1 bunch ($1.79)
Red Leaf Lettuce, 4 oz ($0.37)
Boston Lettuce, 1 bunch ($0.99)
Kohlrabi, 1 lb ($3.99)
Fresh Rosemary Plant ($2.99)

Total share value: $27.63

Nothing that unusual this week, though I suppose the kohlrabi could still go in that category and I'm glad to see it again.  Several vegetables are making their first appearance (red beets, cauliflower and Boston lettuce), and it seems my old nemesis cilantro is back.  I am separating and saving the leaves from the kohlrabi again, as well as the beets.

Baked Shrimp and Grits with Swiss Chard

When picking recipes, I usually don’t give much thought to the type of cuisine.  I focus more on the ingredient(s) I want to use and search around until something catches my eye.  Then I look closer to make sure it’s at least somewhat healthy, not too time consuming to make (for weeknights at least) and won’t require a bunch of ingredients that I don’t have already.  Overall though, the majority of my cooking falls into the Italian/French/American category with only occasional deviations to Latin America or Asia.  Within the American realm of food, southern style cooking is a favorite of mine and the urge for shrimp and grits bubbled to the surface when I came across this recipe from the Food Network while looking for a use for the Swiss chard in last week's share.  

First thing you've probably noticed after clicking on that link is that this is a polenta recipe, not grits.  “What’s the difference?” you ask?  Well, to that I do not have an answer that would prevent me from receiving irate emails from Italians and Southerners alike.  So instead I suggest you take a look at this very informative article on NPR.com in which the author explains the differences much better than I ever could.

The recipe below is basically the same with less garlic, replacing the polenta with grits and the addition of the shrimp. The end result was very good, and felt much more like a Southern style dish than Italian, which was my goal.  I suppose that if you wanted to be even more Southern in the ingredients, you could replace the mozzarella with white cheddar and use collard greens instead of the chard.


Share contents used:
Swiss Chard

Ingredients
1 tablespoon olive oil
3 garlic cloves, minced
8 to 10 cups chopped Swiss chard, stems and leaves kept separate
Butter for greasing dish plus 1 tablespoon butter for the grits
2 cups milk
1 1/2 cups water
Salt and pepper
1 cup white corn grits
3 tablespoons grated Parmesan cheese
1 cup grated mozzarella cheese
1/3 cup sour cream
1 pound shrimp, peeled and cleaned, tails removed

Preparation
Preheat the oven to 400 degrees

Heat the oil in a large skillet over medium heat. Add the garlic and cook 30 seconds, then stir in the Swiss chard stems. Pour in a few tablespoons of water and cover the pan. Cook the stems 2 minutes. Remove the cover, the mix in the Swiss chard leaves. Cover the pan again and cook until the leaves wilt, about 3 minutes. Toss occasionally. Remove the pan from the heat and let cool, uncovered.

To make the grits, combine the milk, water, and salt in a medium size saucepan and bring to a boil. Reduce the heat to medium low and slowly drizzle in the dry grits, whisking all the while with a wire whisk. Continue to cook and whisk the grits until it is the consistency of mashed potatoes and tears away from the sides of the pan, about 5 minutes. Whisk in 2 tablespoons of the Parmesan cheese, the 1 tablespoon of butter, and the mozzarella cheese.  Season with salt and pepper to taste.

Butter a 2 1/2 quart shallow baking dish, spread half the grits in the baking dish. Spoon on the Swiss chard and distribute it evenly. Drop on small spoonfuls of the sour cream and spread it with the back of a spoon. Spoon on the remaining grits and spread it out. Place the shrimp in a single layer on top of the grits.  Season shrimp with salt and pepper and sprinkle on the remaining tablespoon of Parmesan cheese.

Bake for 20 to 25 minutes, or until the shrimp are cooked through and the grits are starting to brown.

Sunday, June 16, 2013

Classic Cesar Salad

With one or two heads of lettuce in every share so far, salads show up on our table nearly every night.  Tonight, with a big bunch of Romaine needing a home, a classic Cesar salad seemed in order.  We rarely use store bought dressing, opting instead to use simple oil and vinegar mixtures, so of course the Cesar dressing would need to be homemade as well.


I followed Bon Appetit's version of the classic recipe with one change in that I replaced the egg yokes with mayonnaise (so my pregnant wife could eat it), using 1 tablespoon per yolk. I made only half a recipe, which was more than enough for a big two-person portion.  For those who are a bit nervous about anchovies, they do not make the dressing taste fishy, but instead add a real depth of salty flavor that makes it a true Cesar.  

Share contents used:
Romaine lettuce

Strawberry Scones

I have mixed emotions about pick-your-own farms.  On the one hand, it can be a nice way to entertain the kids for an afternoon while you get to enjoy the outdoors as well as some as-fresh-as-it-gets produce.  On the other hand, you are paying for the privilege of providing the farm with free labor to harvest their fields.  Yesterday, my former opinion won out and the family and I spent the afternoon at a strawberry picking festival at the same farm where we have our CSA membership.  Happily, the farm provided many options in addition to picking, with a petting zoo, bouncy house, pony rides and other kid friendly activities to keep my daughter occupied.  Ever better, for the adults there was a wine tasting hosted by one of New Jersey's wineries, and while the wine was not that good (other than a semi-decent riesling) it provided a nice oasis of civility in what was otherwise a giant mosh pit of strawberry scented children. Even though we never made it out into the picking fields, we still brought home more strawberries to add to those from this week's share.


Its always a treat to wake up to fresh baked....well, anything! My wife is a early riser and will occasionally slip downstairs and have the house smelling fantastic by the time the rest of us wake up.  As a father's day surprise, she wasted no time digging into the pile of strawberries and put together a batch of scones for breakfast. The recipe here my wife learned during her time at the French Culinary Institute (which is why everything is measured by weight).

Share contents used:
Strawberries

Ingredients
325 grams bread flour
20 grams baking powder
45 grams sugar
Pinch of salt
110 grams unsalted butter, cut into cubes, chilled
100 grams fresh strawberries, chopped
1 whole egg plus one egg yolk
100 ml heavy cream

Preparation
Heat your oven to 350 degrees.

Mix together the flour, baking powder, sugar and salt in a large bowl.  Add the butter and cut it into the dry ingredients until its about the size of dry lentils.  Mix in the 90 grams of the strawberries.

In a large measuring cup, combine the whole egg and yolk.  Place the cream in a blender with remaining 10 grams of strawberries and puree until combined.  Add the strawberry cream to the eggs and lightly beat the mixture until combined. Add the liquid to the bowl with the dry ingredients and mix until the dough just comes together.  Do not over mix.

Roll out the dough on a lightly floured counter top to a thickness of around 3/4 inches. Cut into triangles (or whatever your desired shape) and place on a parchment paper lined sheet pan.  Brush the scones with a little cream and lightly sprinkle with sugar.  Bake for 10-15 minutes until lightly browned on the bottom and edges.

Happy Father's day to me!


Friday, June 14, 2013

Radish Leaf Soup

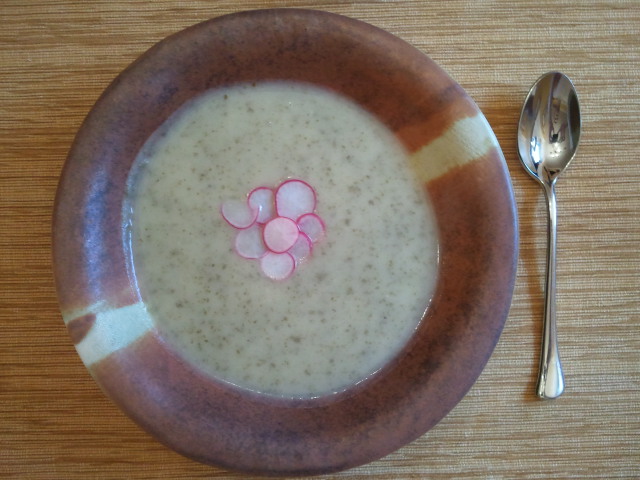
I suppose we all have preconceived notions about food and cooking.  Things that we've been doing or thinking for ever without much thought as to why, usually not even realizing that we may be missing out on something.  This week, I discovered one of mine.  When radishes were included in previous shares, I'd just cut off and discard the leaves without much thought, assuming they were not useful for cooking. This week it occurred to me that I might be wrong about that and saved them separately from the radishes.  A little searching uncovered a variety of uses for the greens, many involving soups.  Even though hot soup is not something one normally thinks about in June, this week has been unusually cool and rainy, making a pot of soup seem like a good idea.

The recipe below is pieced together from several recipes I found online. There is a lot of variation possible here, so you should experiment with other ingredients.  The common item in almost all the recipes I found to include with the radish leaves were potatoes, but everything else could be changed.  The result was quite good; a dominating potato flavor accented with a "green" taste from the radish leaves.  Using sliced radish as a garnish added a nice peppery crunch, and we found ourselves adding more halfway through the bowl.


Share contents used:
All the radish leaves plus a couple radishes

Ingredients
2 tbs butter
4 cups fresh radish leaves, washed and coarsely chopped
2 russet potatoes, peeled and diced (about 4 cups)
1 cup onion, diced
4 cups chicken broth
1/4 cup heavy cream
Salt and pepper to taste
2-3 radishes, thinly sliced for garnish

Preparation
Melt the butter in a large soup pot over medium heat.  Add the onion and a pinch of salt and cook, stirring often until soft.  Add the radish leaves and continue stirring until the leaves are wilted.  Mix in the potatoes then add the broth.  Bring to a boil then cover and reduce heat and simmer for 30 minutes.  Using a blender, puree the soup until smooth then return to the pot (or use a stick blender in the pot if you have one).  Stir in the cream and season to taste with salt and pepper.  Serve with a few thinly sliced radishes floated on top as a garnish.

Parmesan Roasted Broccoli

Not too much to say here, except no more boiled broccoli!  Yay!  It didn't take much extra effort to put together this delicious side dish.  Roasting the broccoli in the oven gives it a different flavor compared to boiling, with a slight charred taste from the tips of the florets browning in the heat.

Recipe courtesy of the Food Network.  Modified below for less broccoli.


Share contents used:
Broccoli

Ingredients
1 pound broccoli
1 garlic clove, peeled and thinly sliced
Olive oil
1/4 tsp salt
1/8 tsp freshly ground black pepper
1/2 tsp grated lemon zest
1/2 tbs freshly squeezed lemon juice
2 tbs freshly grated Parmesan cheese
1/2 tbs julienned fresh basil leaves

Preparation
Preheat the oven to 425 degrees F.

Cut the broccoli florets from the thick stalks, leaving an inch or two of stalk attached to the florets. Peel the thick stalks and slice into 1/4 inch disks. Cut the larger florets through the base of the head with a small knife, pulling the florets apart. Place the broccoli on a sheet pan large enough to hold them in a single layer. Toss the garlic on the broccoli and drizzle with olive oil. Sprinkle with the salt and pepper. Roast for 20 to 25 minutes, until crisp-tender and the tips of some of the florets are browned.

Remove the broccoli from the oven and immediately toss with 1 tsp olive oil, the lemon zest, lemon juice, Parmesan, and basil. Serve hot.

Wednesday, June 12, 2013

Asparagus and Mushroom Risotto

For me, risotto is a dish that embodies what cooking is all about.  The difference between rice and risotto is all in the technique.  If you were to simply put the rice and broth in a pot, bring to a boil, cover and leave it alone, in 20 minutes you'll get broth flavored rice.  But take the same rice and broth and add the willingness to give it your full attention for 20 minutes by adding the broth a bit at a time and stirring, and stirring, and stirring....well, then you get something truly wonderful.  Your patience (and all that stirring) coaxes the starch out of the rice and creates a texture that you'd swear should only come from the addition of heavy cream or cheese. That is what I love about risotto, creamy delicious satisfaction without the fat.

The recipe below is care of Alton Brown and the Food Network.


 Share Contents Used:
Asparagus from week 5

Ingredients
6 cups chicken broth
l cup dry white wine
2 tbs butter
1 cup finely chopped onion
Salt and pepper
2 Cups Arborio rice
5 oz (3/4 cup) mushrooms, cooked and coarsely chopped
1 1/2 cups cooked asparagus, cut into l-inch pieces
1/2 cup grated Parmesan
1/4 tsp grated lemon zest
1/4 tsp grated nutmeg

Preparation
In a saucepan with lid, heat the broth and wine to a simmer, then keep warm.

In large 3-4 qt saucepan over medium heat, melt the butter. Add the onions and a pinch of salt and sweat until translucent. Add the rice and cook for 3-5 minutes or until the grains are translucent around the edges. Be careful not to allow the mixture to brown. 

Reduce the heat to low. Add enough of the wine and broth mixture to just cover the top of the rice. Stirring often, allow the rice to completely absorb the liquid. Once absorbed, add another batch of liquid to just cover the rice and repeat until all the liquid has been added. After the last batch of liquid is mostly absorbed, add the mushrooms and asparagus and stir until the risotto becomes creamy and the asparagus is heated through. Remove from heat and stir in Parmesan, lemon zest and nutmeg. Season to taste with salt and pepper. Serve immediately.


Week 6 Share


Fresh Stevia plant ($2.99)
Chives, 1 bunch ($0.99)
Romaine Lettuce ($1.29)
Broccoli, 1 lb ($1.69)
Tomatoes, 1 lb 10 oz ($4.85)
Strawberries, 2 lb 10 oz ($5.52)
Swiss Chard, 8 oz ($1.99)
Radishes, 1 bunch ($1.29)

Total share value: $20.61

A couple items in this week's share got my attention right away; the broccoli and the Stevia plant.  Why broccoli?  Well, for me broccoli represents the rut I was in with cooking vegetables.  I bought it every week at the supermarket and every week it ended up being boiled and served plain with maybe a little salt or some oil and vinegar dressing.  Nutritious, but boring. Time to get creative and not let this nice fresh head of broccoli suffer the same fate.

As for the Stevia plant, here is my second CSA WTF moment.  I knew of Stevia as a member of the non-sugar sweetener world, and had a vague awareness that it came from a plant, but certainly did not expect to ever see that plant sitting on my counter.  There is plenty of information on the Stevia plant and its uses on the internet, so here's rundown of what I learned.

The Stevia plant is native to Central and South America where it has been used as a natural sweetener (mostly for teas and other beverages) in that part of the world for hundreds of years.  In its natural form, Stevia leaves can be used fresh or dried and because the sweet compounds in the leaf are not metabolized by our bodies, it is a zero calorie sweetener.  This fact is of course why the food industry uses Stevia, but (no surprise here) in a highly processed form.  Products that contain Stevia will have "Rebaudioside A" on the ingredient list, as this is the single sweetening compound (out of around 7 found in the raw leaves) that is targeted during processing.  Unfortunately, this processing strips away the healthful antioxidants that are also found in the leaves.  It should be noted that the FDA has not approved the use of whole Stevia leaves as a food additive, only the highly purified Rebaudioside A product.  They cite as the reasons concerns over control of blood sugar and effects on the reproductive, cardiovascular, and renal systems.

At the moment I am not sure what (if anything) I'll do with this plant. For now, I'll add it to the herb garden and keep you all posted.

Tuesday, June 11, 2013

Pan Seared Salmon with Swiss Chard

The prepared food section of our local Whole Foods can be a great place for inspiration. Recipes for much of what you see behind the glass can be found on their website, and are often relatively simple to follow.  To find a use for the remaining Swiss chard, I searched their recipes until the dish shown here caught my eye.  Simple, healthy and only took about 30 minutes (most of that from washing and chopping all the greens) from start to finish.  I ended up adding the kohlrabi leaves because there was not quite enough chard left.  The kohlrabi had a slightly tougher texture, but otherwise we could not tell the two apart when mixed together.

The recipe below is from the Whole Foods website with just a couple small tweaks.

Share contents used:
All the remaining Swiss chard
Kohlrabi leaves

Ingredients
1 bunch Swiss chard (plus the kohlrabi leaves)
4 teaspoons extra virgin olive oil
1/2 medium onion, thinly sliced
3 cloves garlic, thinly sliced
4 (4- to 6-ounce) salmon fillets
Salt and pepper, to taste
Juice of half a lemon
1 teaspoon tamari (dark soy sauce)
1 teaspoon toasted sesame oil

Wash and dry the chard. Cut the leaves from the stems. Roughly chop leaves and set aside.

Heat 2 teaspoons of the oil in a large pot over medium heat. Add onion and garlic and cook until the onions are soft and translucent, about 5 minutes. Stir in chard leaves, cover and cook 3 to 5 minutes, stirring frequently. Add 1 tablespoon water, if necessary, to create enough steam to cook greens quickly. When ready, greens should be wilted but still bright green.  Season with salt and pepper to taste before serving.

Meanwhile, season the salmon with salt and pepper. Squeeze lemon juice over the top, then drizzle on the tamari and sesame oil. Turn pieces to coat all surfaces.

Heat the remaining 2 teaspoons oil in a skillet over medium high heat. Add salmon and cook 2 minutes on each side, or just cooked through.

I served the salmon and chard along with rice and the kohlrabi fries shown in this post.


Monday, June 10, 2013

Oven Roasted Kohlrabi Fries

Boy, the last week sure flew by, and while the kohlrabi waited patiently in the crisper, I may have unintentionally limited my options for it.  When I finally found time to research methods of cooking it I learned that a raw preparations can be a good option for kohlrabi.  Shaved over a salad or julienned in a slaw for instance.  Unfortunately, after a week its likely that my kohlrabi will not be that tasty raw, but I still wanted to  prepare it in a way that wouldn't hide its flavor.  To that end we have a simple roasted preparation that I served alongside some salmon and Swiss chard (separate post).


Share contents used
Kohlrabi (bulb only)

Ingredients
1 large kohlrabi – peeled, tough outer layer sliced off; cut into 1/4" sticks
Olive oil
Salt and pepper to taste
1/2 tsp finely chopped fresh oregano
1/2 tsp finely chopped fresh parsley
Freshly grated Parmesan cheese

Heat your oven to 400 degrees. In a bowl, combine the kohlrabi, salt, pepper, herbs and olive oil and toss to coat.  Lay out the kohlrabi on the baking sheet in a single layer. Bake, stirring once or twice until they start to brown, 15-20 minutes. When they start to get brown, sprinkle the Parmesan over and bake for another five minutes. Serve immediately.

These kohlrabi fries were delicious! They had a texture that you might expect from potatoes, but with a much more complex flavor. Sort of similar to the taste of broccoli stems with a peppery hint you'd get from a radish.  

Kale Chips

I guess I've been living under a rock with respect to the kale chip fad that has been going on for the last few years. I sampled some at a Whole Foods a couple weeks back and they were quite tasty but also cost more than my car! Okay, bit of an exaggeration there, but at $6.99 for a bag, they must be very complex and time consuming to make, right? WRONG! Couldn't be easier. The process boils down to four steps: clean, tear, season, and bake (maybe 5 steps if you count eat). I’m not sure why they cost so much in the store, but if kale chips are something you enjoy, then you should try making them yourself. Spend $2 on a bunch of fresh kale and put the $5 you saved towards some other overpriced food fad that you can’t quickly make at home.

Share contents used:
All the kale


Heat your oven to 300 degrees.  Wash and dry the kale, remove and discard the stems and then tear the leaves into bite sized pieces.  Toss the leaves with just enough olive oil to give them a light coating.  You want them covered, but not dripping with oil.  Toss the oiled leaves with salt and/or other seasonings (see below) then spread in a single layer on a sheet pan.  Bake for around 20 minutes, or until crisp, keeping an eye on them to ensure they don't burn.  Once cool, store in an airtight container.

Here are the other seasonings I tried with this batch in addition to the salt.
Garlic powder
Chili Powder
Cider vinegar (add with the oil before baking)

My personal favorite were the garlic chips, but they all had nice flavor to them. Go easy on the salt and seasonings, as a little can go a long way. An added bonus was that my almost 3 year old daughter seems to like them as well. Anything to get her eating more vegetables!


Sunday, June 9, 2013

Swiss Chard, Ham and Cheddar Quiche

My wife was in charge of dinner tonight and with meals like this, I may have to let her cook more often!  She used around half of the Swiss chard along with onion and ham in a fantastic quiche recipe she found on a website called Real Simple.  The ham was an addition, but otherwise she followed the recipe as written.

Share contents used:
Half of the Swiss chard
All the remaining romaine (in a side salad)


Ingredients
1 tablespoons olive oil
1 bunch Swiss chard, stems removed, chopped
1 onion, chopped
1/2 cup diced cooked ham
3 large eggs
3/4 cup half-and-half
kosher salt and black pepper
2 ounces cheddar, grated (1⁄2 cup)
1 prebaked 9-inch piecrust

Preparation
Heat oven to 350° F. Heat 1 tablespoon of the oil in a large skillet over medium-high heat. Add the chard and onion and cook until tender, 3 to 4 minutes. In a medium bowl, beat the eggs with the half-and-half; season with 1 teaspoon salt and ¼ teaspoon pepper. Add the cheddar and chard mixture and mix to combine. Pour into the prebaked 9-inch piecrust and bake until set, 40 to 45 minutes.


Saturday, June 8, 2013

Peas and Lettuce

I love a good ham dinner.  For me, its not enough to enjoy it once or twice a year on holidays, so once in a while I'll pick up a ham steak to build a meal around.  Peas are a great accompaniment to ham, so for tonight's dinner I wanted to find a more interesting way to use them that would involve some of the CSA vegetables.  After a bit of searching, I came across a French preparation called Petits Pois à La Française, which simply means "French style peas".  The traditional preparation involves peas, onions, lettuce, stock, creme fraiche and butter among other things and seemed a bit too rich for my tastes.  There were, however a lot of simpler variations on this recipe, and what you see here is based on bunch of recipes from here and there.  This recipe was delicious with the frozen peas, but I'll probably try this again when I can get my hands on from fresh peas.  Bon Appetit!


Share contents used:
Romaine lettuce from week 4

Ingredients:
2 tbs unsalted butter
3 cloves garlic, pressed
1½ cups frozen green peas
1 cup frozen pearl onions
6 oz romaine lettuce, washed, stems removed, and sliced into small strips
Salt and pepper, to taste


Heat 2 tbsp. butter in a large skillet over medium heat; add the garlic and onions and cook, stirring often, until the onions are thawed but not browned, about 4 minutes. Add the peas, season with salt and pepper and cook until hot, about 4 minutes. Stir in lettuce and 1 tbsp. water, season with salt and pepper. Stir until lettuce is just wilted.  Serve immediately.


Strawberry Banana Smoothies

Despite our best efforts, that bunch of bananas we bought last weekend survived the week and now we are left with a couple that are doing their best leopard impression.  A smoothie is a great way to use these up and a healthy treat for adults and kids alike. This morning we made use of the remaining strawberries from the week 5 share for the classic strawberry-banana combination.

Share contents used
Strawberries
Honey (from week 1)

Ingredients:
10 oz fresh strawberries, washed, stems cut off
2 ripe bananas
1-2 tbs honey (to taste)
3/4 cup plain yogurt
1 cup ice cubes


Place everything in a blender and puree until smooth.  Easy as that! The ice can be optional if you think ahead and freeze the bananas overnight.  A great use for leftovers is to freeze in a popsicle mold for a cold treat later on.


Thursday, June 6, 2013

Stir Fry with Bok Choy and Chicken

Have you ever looked into your refrigerator and had 3 or 4 different vegetables stare back at you, and none of them alone are enough for a meal, or even a side dish?  One carrot, half a bell pepper, the middle of a celery, they all somehow escaped your cutting board.  Until now! Stir fry is my go to meal to deal with the lonely remains of the produce drawer.

Stir fry is a wonderfully versatile way of cooking.  Just about any vegetable or protein can be used, and the options for sauce and other flavorings are seemingly unlimited.  Below is what went into tonight's recipe, but other times you might find mushrooms, bell pepper, eggplant (the small Italian variety), onions or spinach in the mix.  Beef, pork, tofu or shrimp might stand in for the chicken.  I do recommend that you limit yourself to 4 vegetables and only 1 protein.  Otherwise the flavors tend to get all muddled together, and not in a good way.  Also, you may not have a big enough pan!

Thanks to my wife for handling the cooking!

Share contents used:
Bok Choy
Scallions

Ingredients
1 tbs canola or vegetable oil
1 tsp grated ginger
Pinch of crushed red pepper (or more to taste)
1 lb Bok Choy, stems and leafs separated,  both cut into 1/4" sticks.
4 scallions, cut into 1" peices
1 chicken breast, cut in to 1/4" x 2" strips
4 cups broccoli florets
1 large carrot (or a handful of baby carrots)
1 tbs soy sauce
1 tbs mirin
1 tbs cooking sake
1 tbs brown sugar
1 tsp corn starch
1 tsp sesame oil

Preparation
Stir fry cooking moves fast, so clean, chop or otherwise prep all your ingredients before you start cooking.

Cook the broccoli ahead of time by boiling it for 3-5 minutes until tender. Drain and set aside.

Made the sauce by mixing together the soy sauce, mirin, cooking sake, brown sugar and corn starch in a small bowl.  Set aside.

Heat the oil in your wok (or a large skillet) over high heat until very hot, but not quite smoking.  Season the chicken strips with salt and add to the wok.  Cook, stirring frequently until the chicken is just cooked through, then remove from the wok to a small bowl.  Add the ginger and red pepper flakes to the wok and stir for 10 seconds, then add all the vegetables except the broccoli. Cook, stirring frequently until the vegetables are just starting to soften.  Timing on this will depend on what you are using and how thick your slices are, so start tasting after about 3 minutes.  You want them to be just slightly under-cooked before moving to the next step. Add the broccoli, chicken and sauce mixture to the wok and cook for another minute, stirring to combine everything.  Taste to ensure the vegetables are cooked to your liking, I try to shoot for keeping them still crisp, though this is easier said than done.  Turn off the heat.  Mix in the sesame oil and serve immediately over rice.


What's in a name?

The name I gave this blog was really just a place holder, as I had to name it something to get it started.  I figured that I should just start typing and see how my thoughts and feelings about this project developed.  So finally, the other day during my long commute home, inspiration hit!  In addition to the new name, I have updated the blog's look and added a link to a page with some background on where the name came from.  Let me know what you think!

Wednesday, June 5, 2013

Week 5 Share


Asparagus, 1 lb ($2.99)                                          Swiss Chard, 1 bunch, ($2.99)
Bok Choy, 1.75 lb, ($1.64)                                      Kale, 1.25 lb, ($2.11)
Red Leaf Lettuce, 0.5 lb, ($0.75)                            Scallion, 1 bunch, ($0.66)
Parsley, 1 bunch, ($0.99)                                        Strawberries, 1.5 lb, ($4.56)
Fresh Dill Plant ($2.49)                                           Kohlrabi, 1 lb, ($3.99)

Total Share Value = $23.17


Kohlrabi??  Here I have my first CSA WTF moment.  I have never cooked with, or even heard of kohlrabi. To the internet!

The name is German, meaning "cabbage turnip" which, I suppose is kind of what it looks like.  Kohlrabi grows above ground and is in the same vegetable family as cauliflower, broccoli and kale, and  is quite nutrient rich.  Both the bulb and the leaves are edible, so I'll have to come up with some way to use them both.  I should note that the $3.99 price I gave it was a bit of a guess based on what I found online.  Not a big surprise that my local supermarket doesn't sell them.


Swiss chard is another new one for me.  I pass by it all the time at the grocery store, but have never cooked it.  Very exciting to have two vegetables that are new to me to play with this week!


Finally, a quick status update on the Week 4 share.  You'll recall I received two very large bunches of lettuce (red leaf and romaine) and using them up in ways other than salads has proven to be quite a challenge.  Only some of the romaine is left (full disclosure; I did give away half of the red leaf), but I've got some ideas on non-salad ways to use it.  Luckily it is holding up quite well in the fridge.

Tuesday, June 4, 2013

Penne with Sausage and Arugula

This tasty pasta dish was a great way to use a lot of arugula all at once.  We actually wished there was more once the leaves had wilted down to the little bits you see in the picture. The share provided only half of what the recipe called for and I will definitely use the full amount if I make this again.

Here is the link to the recipe. I modified it a bit by using turkey sausage instead of pork.  Don't skip the toasted bread crumbs, we tasted the pasta with and without them and the crunch they add is a really nice textural element.

Share contents used:
All of the arugula


Monday, June 3, 2013

Scallops with Spinach and Beans


A quick one for tonight. Canned beans cooked with garlic, onions and spinach make for a hearty accompaniment to some fresh sea scallops.  Serve this with a crisp side salad lightly dressed with oil and vinegar to give yourself an acidic bite in between the rich mouthfuls of scallops and beans.


Share contents used
All the spinach
A few of the red leaf and romaine leafs for the side salad


Ingredients
1 tbs olive oil
1/3 cup onion, minced
1 clove garlic, minced
1 can white beans (14 oz), rinsed and drained
4 cups baby spinach
1 lb large sea scallops
Salt and black pepper to taste
1/2 tbs olive oil
1/2 tbs butter
2 tbs fresh lemon juice

Preparation
Heat the oil in a medium saucepan over low heat. Add the onion and garlic; saute until the onion is soft and translucent, 2 to 3 minutes. Add the beans and spinach and continue to cook until the beans are hot and the spinach is wilted. Cover to keep warm.

Heat the 1/2 tbs oil and butter in a large skillet over medium-high heat. Rinse and dry the scallops and season with salt and pepper on both sides. Add the scallops to the pan and sear the scallops for 2 to 3 minutes per side, until nicely browned.

Before serving,  season the beans with salt and pepper, then divide among your plates and top with scallops. Drizzle with the lemon juice and serve immediately.

Grilled Asparagus

I could not let asparagus season go by without putting them on the grill.  This simple preparation like this is arguably one of the best ways to enjoy these tender spears.  Grilling gives the best flavor, but roasting in the oven is a good alternative when the weather isn't cooperating.

Last night the asparagus from week 4's share went on the grill to serve as a side to some marinated grilled chicken kabobs. I used a plain preparation, which I've written out below along with two of my other favorite ways to prepare them.


Plain
As easy as it gets.  Trim, wash and toss on the grill over medium high heat.  This is all about letting the asparagus flavor shine, so cook them only long enough to get some good grill marks, 5 minutes or so, turning once. Serve immediately with a pinch as salt if desired.


Olive Oil & Herbs
Trim and wash the asparagus, then toss with olive oil, chopped fresh thyme, salt and pepper. Cook as directed above.  I love the fragrance and flavor that thyme adds, but just about any herb could work here.  Just use your imagination!


Butter and Garlic
Melt unsalted butter (1 tbs per pound of asparagus) and mix with crushed garlic.  Toss with the asparagus to coat then season with salt and pepper.  The butter will cool and stick to the asparagus, trapping the garlic against it.  I recommend this preparation only with the grill because it allows most of the butter to run off as the asparagus cooks.  Doing this on a sheet pan in the oven will result in your asparagus sitting in a pool of butter.

Sunday, June 2, 2013

Strawberry Strawberry Cheesecake

No, that's not a typo in the title.  This fantastic cheesecake has strawberries in the cake as well as on it.  The recipe was provided by Bon Appetit, and the labor by my wife.  Thanks sweetie!

Here is a link to the recipe. The sugar was reduced by a quarter cup and the taste did not suffer one bit.

Share contents used:
All the strawberries that escaped my daughter's stomach.