Tuesday, August 13, 2013

Week 15 Share


Blueberries, 1 pt ($1.99)
Cucumber, 2 ($1.32)
Doughnut peaches, 13 oz ($2.42)
Eggplant, 1 lb 11 oz ($2.17)
Corn, 3 ears ($0.99)
Dill, 1 bunch ($1.49)
Bell peppers, 1 lb 2 oz ($1.67)
Pristine apples, 14 oz ($1.74)
Carrots, 1 bunch ($2.00)
Yellow squash, 14 oz ($2.61)
Radish, 1 bunch ($1.29)

Total Share Value = $19.69

First apples of the season for me! The pristine apples here are a very crisp variety with a sweet-tart flavor. The name come from the fact that they tend to have very smooth, almost pristine finish with light yellow to pinkish coloring. Supposedly these apples will keep for quite a while after being picked, though I doubt they will need last that long in our house. The doughnut peaches are fun to see as well. I've always avoided buying them because they typically cost half again as much as regular peaches but taste pretty much the same. I also have to say I'm glad to see only 2 yellow squash this week...

Monday, August 12, 2013

Peach and Blueberry Galette

A galette is a French term that describes a round, flat pastry that is typically rustic and somewhat free form in its design. For me, the I would translate to simply mean "easy pie". One crust, no pie plate and no fussy filling, just fresh fruit and a bit of sugar. My wife makes galettes more often than regular pies for this reason that its a lot less work and just as delicious. Galettes are great as desserts, but can just as easily be made from savory ingredients as well. Sauteed vegetables, meats, cheeses, egg or just about anything else you can think of could likely work as a galette filling, and I gurantee that this will not be the last time you see a galette on this blog. This time of year however, when the peaches are fresh and sweet, its a no-brainer to use them for the filling. All credit for this recipe and the work to make it goes to my wife. Thanks sweetie!


Share Contents Used
Peaches
Blueberries

Pie Crust
2.5 cups flour
2 tbs sugar
1 tsp salt
1 cup chilled butter, cut into 1/2 inch pieces
1/4 to 1/2 cup of ice water

Filling
6-7 peaches
2 tbs sugar
1/4 cup blueberries

Preparation
To make the crust, place the flour, sugar and salt in a food processor and mix to combine.  Add the butter and process until the mixture forms into a coarse crumb texture. With the machine running, slowly pour 1/4 cup of water into the feed tube until the dough just holds together when you pinch it between your fingers. Add more water if necessary to achieve this. Try to minimize the processing time to no more than 30 seconds if possible. Dump the dough out onto your counter and divide in half. Form each pile into a disk, wrap with plastic wrap and refrigerate for at least an hour before using. Once properly chilled, take one disk out of the fridge (freeze the other for another day) and place it on a floured work surface. Gently roll out the disk to a 12-14 inch circle. Don't worry about making it super even and neat, just as long as you have a solid base to place the filling and enough extra edge to fold over. Place the rolled out dough on a sheet pan lined with parchment paper.


To make the filling, peel the peaches then remove the pit and slice into thin segments. You should end up with at around 4 cups of peach slices. Place in a bowl and toss with the sugar, you can use more or less to your taste based on the sweetness of the peaches.


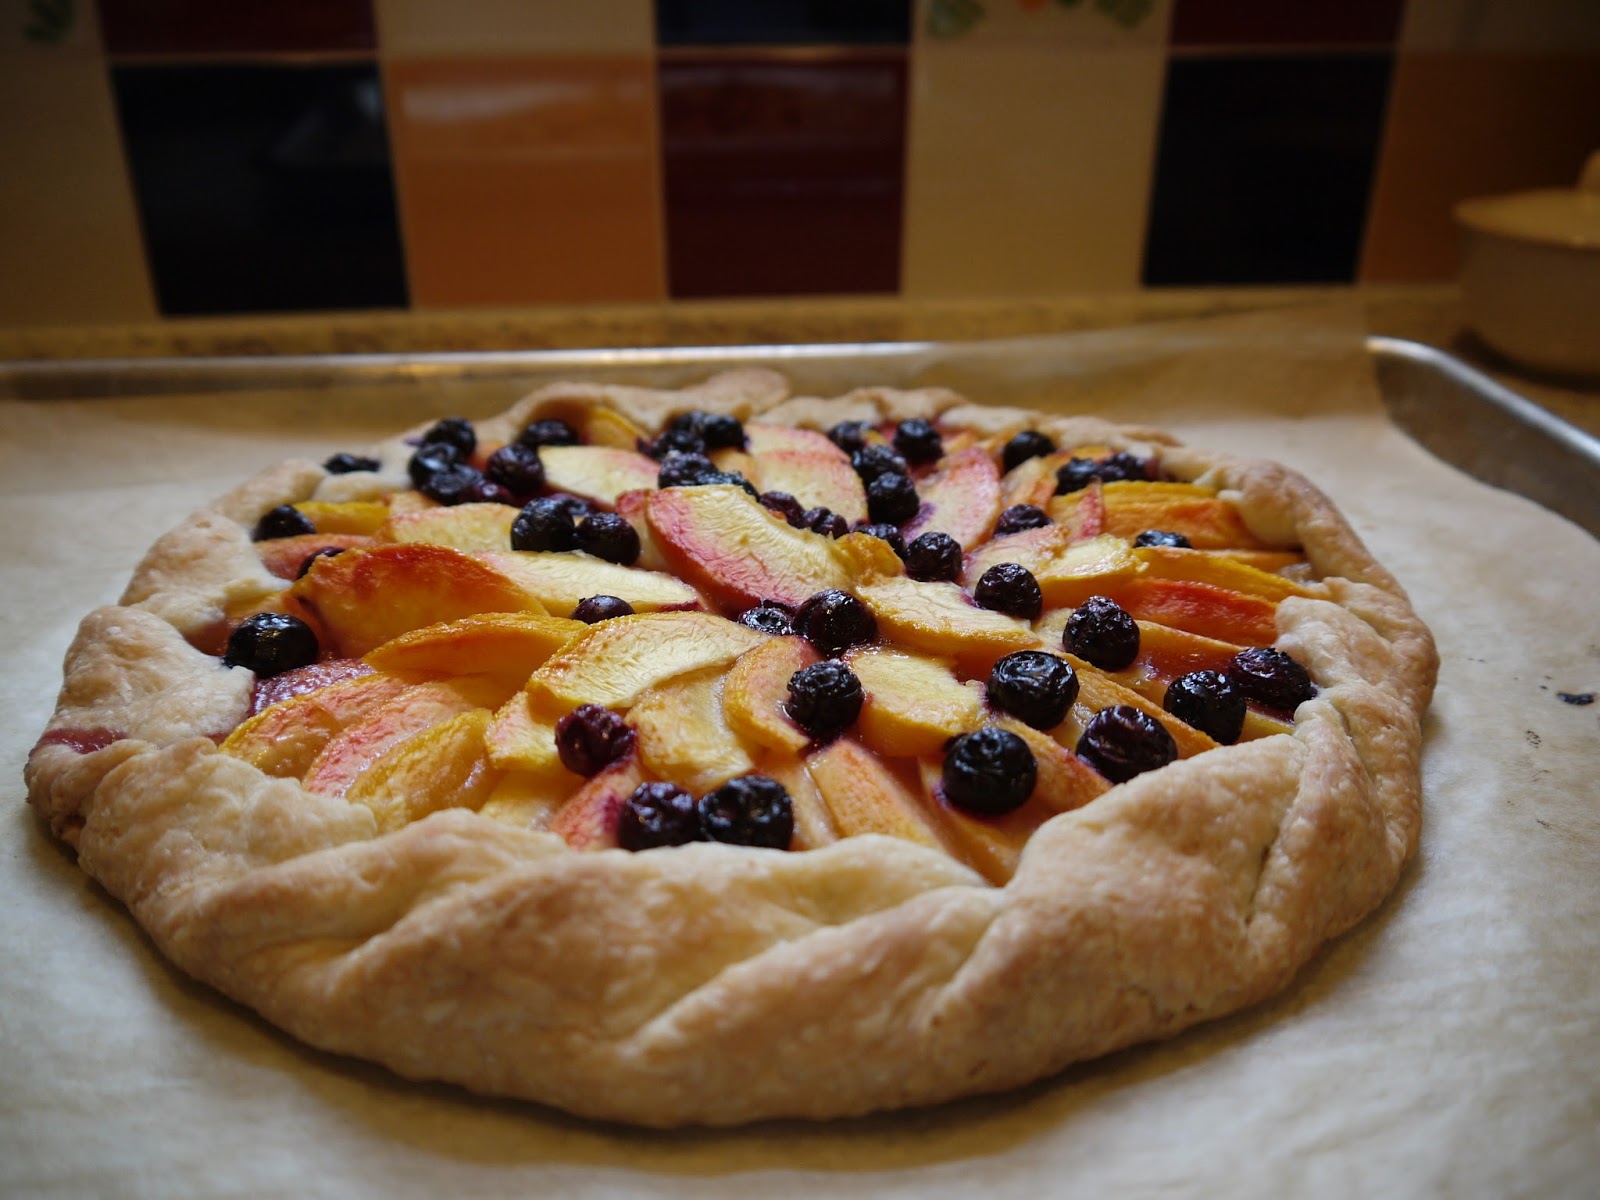
Leaving around a 2 inch edge, arrange the peach slices on the crust, overlapping them in a circular pattern until the it is filled to the middle. Alternately, if this look isn't important to you, just dump the slices in the middle and spread them out evenly, leaving 2 inches of dough around the edge. Fold the edge up and over the filling, working your way around and folding the crust over itself until it looks something like you see above. Keep in mind that this is suppose to be a rough, rustic look so don't make yourself crazy trying to make it even. Just be sure that the entire edge is covered to prevent leaks during baking. Finally, scatter the blueberries over top of the filling. Bake in a 425 degree oven for about 40 minutes, or until the crust is golden brown and the filling is bubbling. Let cool completely before serving.

Sunday, August 11, 2013

Bread & Butter Pickles

My last attempt at pickling was a reasonable success; great flavor, but less than desirable texture. A bit of post pickling research revealed that the method I used (lacto-fermentation) will typically result in a softer texture. I prefer my pickles to have more crunch to them, and the sweeter "bread and butter" variety are a favorite of mine, so that's what I'm trying to make this time. The brine used here is very different from my previous batch, which was just salt and water. This brine is based on vinegar and includes sugar as well as a variety of spices. One other big difference is that the salt water brine is poured over the cucumbers at room temperature, while this vinegar brine is poured while still hot. Lastly, this recipe goes straight in the refrigerator for a week, while the salt water method sat on the counter for just 2-3 days to complete the pickling process. The recipe I used below is a slightly altered version of this one from Alton Brown.


Share Contents Used
Cucumber

Ingredients
1/2 of a sweet onion, thinly sliced
2-3 medium cucumbers, thinly sliced
1 cup water
1 cup apple cider vinegar
1 1/4 cups sugar
Pinch of kosher salt
1/2 teaspoon mustard seeds
1/2 teaspoon turmeric
1/2 teaspoon celery seeds
1/2 teaspoon pickling spice


Pickling spice is a blend of spices that add a lot of subtle flavors and aromas to your brine. The spices in the blend are whole and the type and ratio of spices can vary with the different blends that are available. I went with McCormick Pickling Spice that contains cinnamon, allspice, mustard seed, coriander, bay leaf, ginger, chilies, cloves, pepper, mace and cardamon (whew!). I'm sure that serious picklers make their own blends, but store bought is fine for me!


Preparation
Combine onion and cucumber slices into clean mason jars (I needed two 24oz jars to fit everything). You want the jars full, but not packed too tightly. In a small saucepan, combine the water, vinegar, sugar, salt and spices and then bring to a boil. Simmer for 5 minutes to allow time for the spices to infuse into the liquid. Carefully pour the hot pickling liquid into your jars with the cucumbers and onion slices, completely filling the jar. I always make a mess when trying to pour slowly out of a pan, so I first transferred the hot liquid to a quart sized measuring cup so the spout would make control of the pour easier. Allow the liquid to cool to room temperature before closing the tops of the jars. Refrigerate the pickles for a week before trying. They should keep for about 2 months in the refrigerator.


The brine smelled fantastic as I poured it in the jars, and I have a good feeling that these bread and butter pickles are going to be really good. Check back in a week or so and I will update with the results.

Thursday, August 8, 2013

Cabbage and Cucumber Salad with Sesame Dressing

To be honest, I'm not really sure if this should be called a salad or a slaw. The cabbage and carrots are shredded like in a slaw, but the cucumber and bell peppers are chopped like in a salad. Maybe a slawlad?


Well, whatever you want to call this, it was very good and making the sesame dressing from scratch really made the difference. A much more pure sesame flavor than what you get with the bottled dressings. We ate this as a side to some miso glazed scallops, but I could see it being used to accompany just about anything, all you need to do is change up the dressing to fit the other flavors on the plate. One tip to keep the leftovers fresh longer is to only dress what you will eat. Storing the remaining salad undressed will prevent the dressing from making it soggy and will also give you that option of trying other dressing with other meals.


Share Contents Used
Cabbage
Carrot
Cucumber
Bell Pepper

Ingredients
1/4 of a cabbage, cored and shredded (about 4 cups)
1 cup shredded carrot
1 large cucumber, peeled and chopped
1 bell pepper, thick julienne
2 tbs unseasoned rice vinegar
1 tbs soy sauce
1 tbs sesame oil
1 tbs light brown sugar
1 tsp salt
1/2 tsp pepper
1 tsp sesame seeds


Preparation
Combine the cabbage, carrot, bell peppers and cucumber in a large bowl and toss to combine. In a separate bowl, combine the rice vinegar, soy sauce, sesame oil, sugar, salt, pepper and sesame seeds and whisk to combine. Taste for seasoning and adjust as you like. To serve, place a the portion of the salad you will eat in to a clean bowl and toss with dressing to taste. 


Wednesday, August 7, 2013

Sweet Corn Ice Cream

When I was a kid, sweet summer corn was always such a treat because it tasted like dessert and yet there it was on my dinner plate! To this day, I look forward to the few weeks each year when its REALLY good and eat it as often as I can. I see that same enjoyment from my daughter as well when we give her a piece of an ear to chew on (once we finally convinced her to try it that is...). So if we already feel like we're eating dessert, why not make it official? And since fresh corn can be as good cold as warm, why not try to make ice cream with it? Lucky for me, a food writer for the New York Times had the same idea and provided a great looking recipe that you see here. The only difference is that I skipped the sauce and instead used some raspberry puree we had left from another project.


Share Contents Used
Sweet Corn

Ingredients
4 ears as fresh as you can get sweet corn
1 1/2 cups milk
2 cups heavy cream
1 cup plus 1 tablespoon sugar
6 large egg yolks
1/4 teaspoon salt
1/4 cup sour cream

Preparation
Shuck the corn then slice the kernels off the cobs and place them in a large saucepan along with the milk, cream and 1/2 cup of the sugar. Put the cobs in the pan as well (breaking in half if you need to). Bring the mixture to a boil, then remove from heat, cover and let stand for 1 hour to allow the corn flavor to infuse into the milk. When the hour is up, discard corn cobs. Using an immersion or regular blender, purée the corn kernel and milk mixture then return mixture to a simmer for 1 minute and turn off heat.


In a small bowl, whisk the egg yolks together with 1/8 teaspoon of the salt and 1/4 cup of the sugar. Add a cup of hot cream mixture to the yolks, stirring constantly to prevent them from curdling, then add the yolk mixture back into the pan, stirring well to fully combine. Cook the mixture over medium-low heat, stirring constantly, until the custard thickens enough to coat the back of a spoon, 4-5 minutes. Do not let it boil.


Strain the custard through a fine mesh strainer, pressing down on the solids to extract as much of the custard as possible. Discard the solids. Whisk the sour cream into the custard until smooth then place the bowl with the custard into a larger bowl filled with ice water and let the custard cool, stirring occasionally. Be careful not to get any ice water in the custard. Once cooled, remove the custard bowl from the ice bath, cover and chill in the refrigerator for at least 1 hour.


When the custard is full chilled, pour into an ice cream maker and freeze according to manufacturer’s directions. Transfer to a freezer-proof container and freeze for 3-4 hours before serving. The raspberry puree is simply frozen raspberries that have been thawed and briefly pureed in a food processor with a bit of sugar added to taste.


Full disclosure time here: I did not like this ice cream, and neither has anyone else I've tested it on. I'm confident that I made it right because it tastes very much like sweet corn and has a nice smooth texture one expects with ice cream. In the end, the corn flavor just didn't work in an ice cream for me. Even though there is plenty of sweetness, this really is a savory ice cream, which I guess is a bit more Iron Chef than I was expecting. I imagine there are lots of people out there that would like it, and I am not saying this to discourage you from giving this a try, but I wanted to be honest with you all. I guess for now the sweet corn in our house will stay on the dinner plate.